Following Steve’s last post I’ve finally decided to try out a gyro!
I’ve gone for the same gyro that Steve discussed in his post, the Futaba GYA 553 3-Axis gyro. My first impression was slightly shocked as to how small it is!
Take a look at it on my hand:
I’ve never used a Gyro before or setup one up, I’m pleased to say this was pretty simple.
First the plumbing
You use the supplied lead to plug into the SBUS2 port on the gyro straight into the SBUS two port on your RX. Which of cause means you need an RX that has SBUS2. My go to Futaba RX is the R7008SB.
Disconnect all of your servos from the RX and plug them into the corresponding ports on the Gyro, but leave the throttle directly connected to the RX. You only need the servos that the gyro will help stabilise. Elevator, Ailerons and Rudder. In my model I have two aileron servos being plugged directly into the RX, no Y lead, so they both moved across into the corresponding ports.
The ports are clearly labelled on the gyro, AIL, AIL2, ELE, ELE2 and RUD. However it’s worth noting you need to map the channels correctly on your transmitter. Let me explain:
Mapping channels (functions)
I’m using a Futaba T18SZ. The screen below is the Function menu which lets you assign Functions to channels, rather than swapping everything around on the RX.

You need to make sure the Functions are assigned to the correct channel as per the gyro instructions:
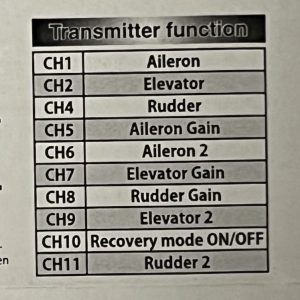
Futaba GYA553 Settings – Channel mapping
In addition to this you need to make sure each of the gyro axis is also assigned to a switch.
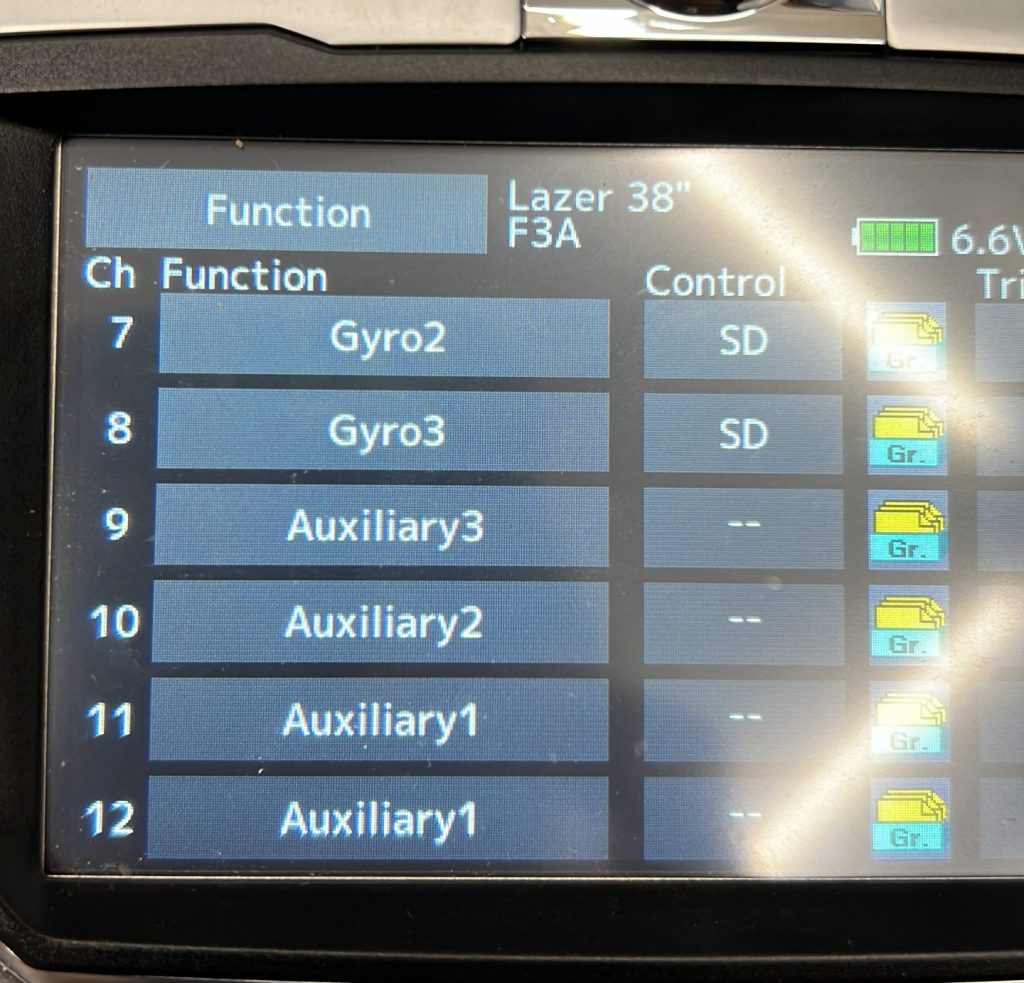
You can see Gyro2 and Gyro3 assigned to channel 7 and 8, and also assigned to the same switch, SD. Gyro is also assigned to a channel and the SD switch.
All of this is in the instructions that come with the gyro but wasn’t obvious to me when I first started setting it up.
Set the switch
The next step is to set the switch, so far we have only assigned the switch to the channel but we have not set it. The SD switch is a 3 way switch.
The Futaba T18SZ has a separate GYRO configuration screen as shown below. It’s worth noting that new transmitters such as the T16IZ and the T32MZ have a second GYRO screen that allow you to do extra configuration. I’ll cover that separately. If you don’t have the T16IZ or T32MZ then you can do the ‘extra config’ via the two buttons directly on the gyro.
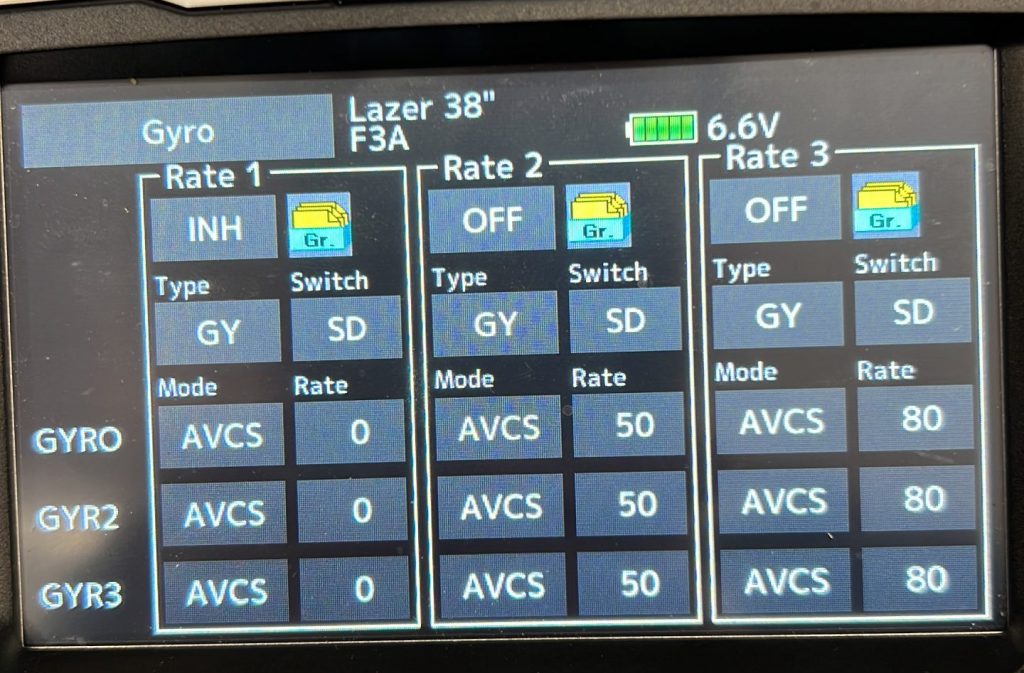
Let’s explain the above screen. The three Rate’s are assigned to each physical position of the switch. I’ve assigned the gyro to the SD switch which is a three way switch. Therefore for me Rate 1 is ON, OFF, OFF. Rate 2 is Off, On, Off, Rate 3 is Off, Off, On.
If you flick the switch while on this screen you will see the different Rate sections turn On or Off
Still with me? We have the gyro wired in and the transmitter configured. I should point out that in the video above the actual rates assigned to each of the three gyro axis are my own settings, that I’ve not yet tried. 50 on rate two and 80 on rate 3 for all three gyro axis.
Important configuration
The next thing we need to do is the important extra config that I can’t do from my T18SZ. I therefore had to follow the instructions and use the two buttons directly on the gyro to check all the settings. For me the defaults are fine.
I will however quickly cover them using the manual for the T16IZ.
T16IZ GYA553
On the T16IZ you have an extra ‘Gyro setting’ menu

Within this menu there are a bunch of settings; I’m only going to cover what I need for now. You can download the manual here if you are interested.
If you go into the settings you will see that you can turn each of the gyro axis on and off. Remember we mapped all three of these earlier on to the switch.

if you go through to the ‘Basic Menu’ then hit the ‘Config” button you will see this important screen.

These are all the settings that I manually checked using the two buttons directly on the gyro and watching the light sequences and colours. It would have been much easier if I had this menu on my TX.
The Gyro Set Dir is the main one. If you get this wrong you will end up in a mess or a crash. This setting dictates how the gyro is placed in your model. Facing Up (like mine), on the Left or Right side of your model, or underneath your model (Down).
Regardless of these the arrow on the gyro has to point forward, like so:

You can see the blue arrow on mine is facing forward and my gyro is configured to ‘Up’ as my gyro is facing upwards in my model.
I won’t go into the other settings at this stage as I have covered the main one.
There are a lot more settings on the gyro, however this is as far as I have currently gone. I’m yet to test the model but will update you when I do!
Here’s a quick YouTube short showing most of what I have just covered. If you would like to discuss anything else to do with the gyro please add a comment, either Steve or I will respond.
Cheers, Matt
UPDATE: I’ve now filmed a full configuration video.


0 Comments